Foreword
About This Book
You led your first workshop. The room held together. Now participants face a choice, and you can see the effect.
However, you can also feel the gap between what happened and what could have happened.
The energy dipped after lunch, and you're not sure why. Someone went quiet, and you missed it. The group chose, but you wonder if the process led to the right outcome. On paper, you did everything right, yet something felt off.
This book closes that gap by helping you achieve outcomes most workshops miss: lasting engagement, clear group alignment, and confidence that your process delivers better decisions every time.
We'll go deep on four things that separate competent facilitators from those who request by name: the mindset shifts that change your presence, the architecture of time and energy, the design of physical space and its impact, and a complete technique library you can use for years.
Book 1 got you through the door. This book is about what happens when you decide to get good.
My friend Sarah, a cellist, says the best conductors don't perform; they create the conditions for others to play their best. The bad ones try to be the soloist.
That's the whole book, really. Everything else is just how to do it.
Chapter One
You're Not Running a Meeting
Years ago, I met a cellist in the Chicago Symphony after a performance at our local outdoor venue. When I was walking back to the train, I was wearing a punk band T-shirt, and he yelled, "He loves the band." My girlfriend and I stopped to talk with him, as we thought he was kidding. He was maybe 30 years older and still dressed in a tux from the show. So we stopped.
Our conversation was meandering and fascinating, and almost 30 years later, it's still burned into my mind. He told me the best conductors never play an instrument during performances. "They create the conditions for us to play our best. The bad ones try to be the soloist," he said.
That line has stayed with me throughout my career, and it's become one of my personal mantras for managing teams and for every workshop I've facilitated since.
If Book 1 gave you the sprint plan to survive your first workshop, this book is about what happens after survival. You've done it once. Maybe twice. The room didn't burn down. However, you can feel the gap between what happened and what could have happened. The group made a decision, but you're not sure it was the right process. The energy flagged in the afternoon, and you're not sure why. Someone left frustrated, and you don't know what you missed. In the chapters that follow, you will find concrete strategies to troubleshoot these common situations. From diagnosing energy dips to improving group decision-making to understanding and preventing participant frustration, this book offers actionable techniques you can apply right away in your sessions.
This is where this book steps in: it aims to close that gap. We're focusing on the four things that separate competent facilitators from the ones people actually want in the room: the internal mindset, the architecture of time, the design of physical space, and a library of techniques you can combine like building blocks, or as I like to say, Legos™.
The conductor, not the soloist
The single most important thing to understand about facilitation is that it's not about you. You're not presenting, teaching, or even leading in the traditional sense. You're creating the structure that allows a group to do their best thinking together. The moment you perform, such as sharing your opinion, steering toward your outcome, or filling the silence, you've stopped facilitating and started leading a meeting.
For example, imagine a group brainstorming solutions to a problem. As a facilitator, you set up the activity, give the group space to explore ideas, and listen while keeping time. However, if you jump in to suggest your favorite solution or redirect the conversation toward what you think is best, suddenly you are no longer holding the process; you are driving the content. The group shifts from collaborating to following your lead, and the richness of their combined insights is lost. This simple scenario shows how easy it is to drift from facilitating to leading, often without realizing it.
I catch myself doing this more often than I'd like to admit. A group is discussing an approach I know is flawed, and every instinct in my body wants to say "that won't work because…" However, the moment I do, I've shifted the dynamic. I'm no longer the neutral architect of the process. I'm a participant with a microphone. If you lead teams, this is very easy to context shift to leading a meeting. You have to keep an eye on that.
The discipline is holding the structure and letting the group hold the content. For example, "holding the structure" means you're the one keeping time, guiding the group through each activity, and making sure everyone has equal space to contribute. You know, the conductor.
If a conversation is veering off-topic, your job is to gently bring it back, not by steering the ideas, but by reminding the group of the agreed-upon process. When a discussion heats up or stalls, you introduce a clarifying question or suggest a break, maintaining a productive environment without inserting your own ideas into the content. In this way, you stay focused on managing how the group works together, while letting them own what gets discussed and decided.
What this book covers
- Chapter 2 covers the five internal shifts that transform how you facilitate. These are the unspoken mental models of experienced facilitators.
- Chapter 3 expands on agenda-building with advanced structures: nested cycles, multi-day design, backup plans, and real-time agenda adaptation.
- Chapter 4 presents all five space layouts, with diagrams, use cases, and the specific scenarios in which each works best.
- Chapter 5 offers a library of ten workshop formats, complete with timing, scripts, and materials, for lasting versatility.
- Chapter 6 addresses real-time facilitation: reading the room, pivoting, and recovering when things miss the mark.
- Chapter 7 guides you in building your long-term facilitation practice and professional growth.
Let's get into it.
Chapter Two
The Five Mindset Shifts
Facilitation skills are 30% technique and 70% how you think about your role. By 'role,' I mean your mindset as a facilitator: the level of openness, presence, and awareness you bring into the room. I've watched facilitators with perfect agendas produce mediocre outcomes because they were in the wrong headspace for the role. I've watched facilitators with thin agendas produce extraordinary outcomes because they understood what was actually happening in the room.
This chapter introduces five key mindset shifts that are fundamental to effective facilitation. Rather than requiring years of experience, becoming familiar with these shifts provides a more efficient path to improvement.
Shift 1: From expert to architect
You were probably invited to facilitate because you know the subject matter. Resist the urge to use that knowledge. However, there are moments when your expertise is essential, especially if the group gets stuck on a technical point or needs clarity to move forward. The key is to hold back your input until it truly serves the process, not your own need to share what you know.
Your job isn't to have the best answer. Your job is to design the process that surfaces the best answer from the group. These are fundamentally different things.
In a recent fintech workshop, I held back my strong opinions during the ideation phase. I have a lot of experience in Fintech design, so it was hard. The team landed on a hybrid solution I hadn't considered, one they wholly owned and that worked better than my initial idea.
The practice: Before every workshop, write down your opinions about the topic. Get them out of your head and onto paper. Then put that paper in your bag. Your opinions are not part of the agenda.
Shift 2: From control to containment
New facilitators want control. They want the conversation to follow the plan, the activities to land perfectly, and the group to behave predictably. This is a recipe for frustration. Experienced facilitators aim for containment instead. You set the boundaries: the timebox, the objective, the ground rules, and then let the group move freely within them. Think of it like building a riverbank, not damming the river.
Last year, a workshop quickly went off script. The team surfaced a conflict: two departments had fundamentally different understandings of their shared customer, so alignment was needed before ideation.
I could force the agenda or follow the energy. I chose the latter: ninety minutes on alignment, thirty on ideation. With conflict resolved, ideation was sharper and faster.
The practice: Before every workshop, identify the one non-negotiable outcome. Everything else is negotiable: the sequence, the timing, the specific activities. Hold the outcome loosely. Hold the process even more loosely.
Shift 3: From talking to listening
Most people in professional settings listen to respond. Facilitators need to listen to understand.
This means listening for what's not being said as much as what is. When someone says, "I think that approach could work," are they enthusiastic or resigned? When the room goes quiet after a proposal, is it agreement or discomfort? When two people keep circling the same point, is the argument actually about what they say it's about?
The best facilitators I know spend more time watching faces than reading sticky notes.
The practice: In your next workshop, try this: pause for 3 seconds before you respond or redirect after someone speaks. Don't fill the gap. Count "one-Mississippi, two-Mississippi, three-Mississippi" in your head. You'll be surprised how often someone else jumps in with something better than what you were about to say.
Shift 4: From perfection to progress
Your workshop won't be perfect. None are. An activity will fall flat. Someone will derail a discussion. You'll run fifteen minutes over on the morning session and have to cut something after lunch.
The shift is understanding that none of this means the workshop failed. A workshop fails when it produces no outcome. Everything else is just facilitation, the real-time art of adjusting to what's happening in the room.
I've dealt with projectors failing, participants crying, fire alarms, and decision-makers leaving mid-workshop. Yet, all produced useful outcomes. Every one of those workshops still produced an outcome. Not the perfect outcome. A useful one.
The practice: After every workshop, write down one thing that didn't go as planned and how you handled it. This becomes your pattern library. After ten workshops, you'll have seen most of what can go wrong.
Shift 5: From neutrality to productive tension
Facilitation books talk about neutrality. I think that's incomplete.
A purely neutral facilitator can moderate a polite discussion that produces nothing. The real skill is creating productive tension; surfacing the disagreements that people are too polite to say out loud, then giving the group a structured way to work through them.
This means you sometimes need to push.
The practice: In every workshop, ask at least one question designed to surface disagreement. Not to create conflict, but to prevent the more costly consequences that result from false consensus.
Adopting these five mindset shifts enables facilitators to move beyond rigid adherence to process and instead foster environments where collaboration, growth, and meaningful outcomes can thrive. By embracing the roles of architect, container, listener, adaptive practitioner, and promoter of productive tension, facilitators can navigate the complexities of group dynamics and guide participants toward more impactful, lasting results.
Chapter Three
Advanced Agenda Architecture
Book 1 gave you the five-part structure: Opening, Warm-Up, Core Activities, Synthesis, Close. While that will carry you through most single-session workshops, as your facilitation skills grow, you need a more sophisticated process to manage the increasing complexity: multi-day sprints, complex workshops in which the afternoon depends on what you learn in the morning.
Nested diverge-converge cycles
The simplest agenda has one diverge-converge cycle: brainstorm ideas, then vote on them. However, some workshops require multiple cycles nested within each other, building on the same principles while increasing depth.
Example: A full-day product strategy workshop
Cycle 1 · Morning — Problem Space
Diverge: Each person maps problems they've observed (individual, 15 min)
Converge: Affinity map to themes, dot-vote on top 3 problem areas (group, 30 min)
Cycle 2 · Late Morning — Deep Dive
Diverge: Break into 3 small groups, each takes one problem area and maps root causes (small group, 25 min)
Converge: Each group presents, full group questions and challenges (group, 30 min)
Cycle 3 · Afternoon — Solutions
Diverge: Crazy 8s on solutions for the top problem (individual, 10 min)
Converge: Gallery walk, dot-vote, select top 3 solutions (group, 25 min)
Cycle 4 · Late Afternoon — Commitment
Diverge: Each person writes what they'd need to be true for each solution to work (individual, 10 min)
Converge: Impact/effort matrix, final decision, assign owners (group, 30 min)
Four cycles, each narrowing the funnel. This step-by-step approach guides the group from 'everything is a problem' to 'here's what we're doing and who's doing it.' Each stage builds off the previous, keeping focus throughout.
The architecture rule: Every diverge phase must be followed by a converge phase before the next diverge phase begins. If you diverge twice without converging, you end up with an overwhelmed group drowning in options.
Multi-day workshop design
Multi-day workshops have a pattern that single-day sessions don't. Each day needs its own energy arc, and equally important, there's a meta-arc across the full event, so you must coordinate daily progress with the overall objective.
- On Day 1, focus on exploring and aligning. Give the group time to get on the same page. Avoid rushing to solutions. Use this day to build common understanding and trust between participants. End the day by making sure the group clearly sees the problem.
- On Day 2, emphasize creating and deciding. Leverage the shared context from Day 1 to drive ideation and decision-making. Conclude with definite results.
- On Day 3, if included, focus on planning and commitment. Turn decisions into action plans. Assign owners and define success metrics. Ensure actions from previous days are made durable.
Leverage the overnight effect between Day 1 and Day 2. People process information and may arrive at new insights. Start Day 2 by asking, "What came up for you overnight? Any new thoughts since yesterday?" to capture these changes.
Recovery paths
Things will go wrong in any workshop, so build recovery paths into your agenda before you actually need them. Anticipating issues ensures your agenda remains on track.
- The cuttable activity. Mark one activity per half-day as "cuttable." If you run over somewhere else, this is what you drop. Choose the activity that provides depth, not the one that produces a required output.
- The accordion activity. Design one activity that can expand or contract by 15 minutes without losing its value. Dot voting is great for this; you can add or skip the discussion round.
- The emergency pivot. If an activity completely fails — the group doesn't engage, the prompt doesn't resonate, the output is thin — have a backup move.
Adaptive agendas
The most advanced agenda technique is to design a workshop where the afternoon agenda depends on the specific outcomes of the morning. Use this modular approach to ensure the workshop addresses the group's real-time needs through a clear, flexible process.
To run an adaptive agenda: First, design the morning session in detail. Next, prepare two or three potential afternoon options based on what you might learn. During lunch, review outputs and group dynamics. Then, choose the afternoon path that best fits the group's progress and announce it as the schedule for the rest of the day.
Example — Morning: problem mapping and prioritization
- If the group aligned quickly on the top problem → Afternoon Path A: Jump to solution ideation
- If the group couldn't agree on the top problem → Afternoon Path B: Deeper stakeholder analysis and criteria setting
- If an unexpected conflict surfaced → Afternoon Path C: Facilitated alignment session on the underlying disagreement
Do not mention the paths to the group. Announce the afternoon agenda after lunch as though it were always the plan. Prepare all options in advance to ensure flexibility and better outcomes for group needs.
From the Workshopr team: We are currently working on multi-pathed workshops in a future version of the Workshopr Planner. We see this occasionally and want to help create these.
Try the Plannerarrow_forwardChapter Four
The Five Space Layouts
The layout of a room shapes participant interaction. Rows direct attention to the front, circles promote equality, and scattered pods facilitate small-team collaboration. The influence of room layout is observable in practice. In my experience, the same group can generate markedly different outcomes depending on the arrangement of the space.
1. The Pod Layout
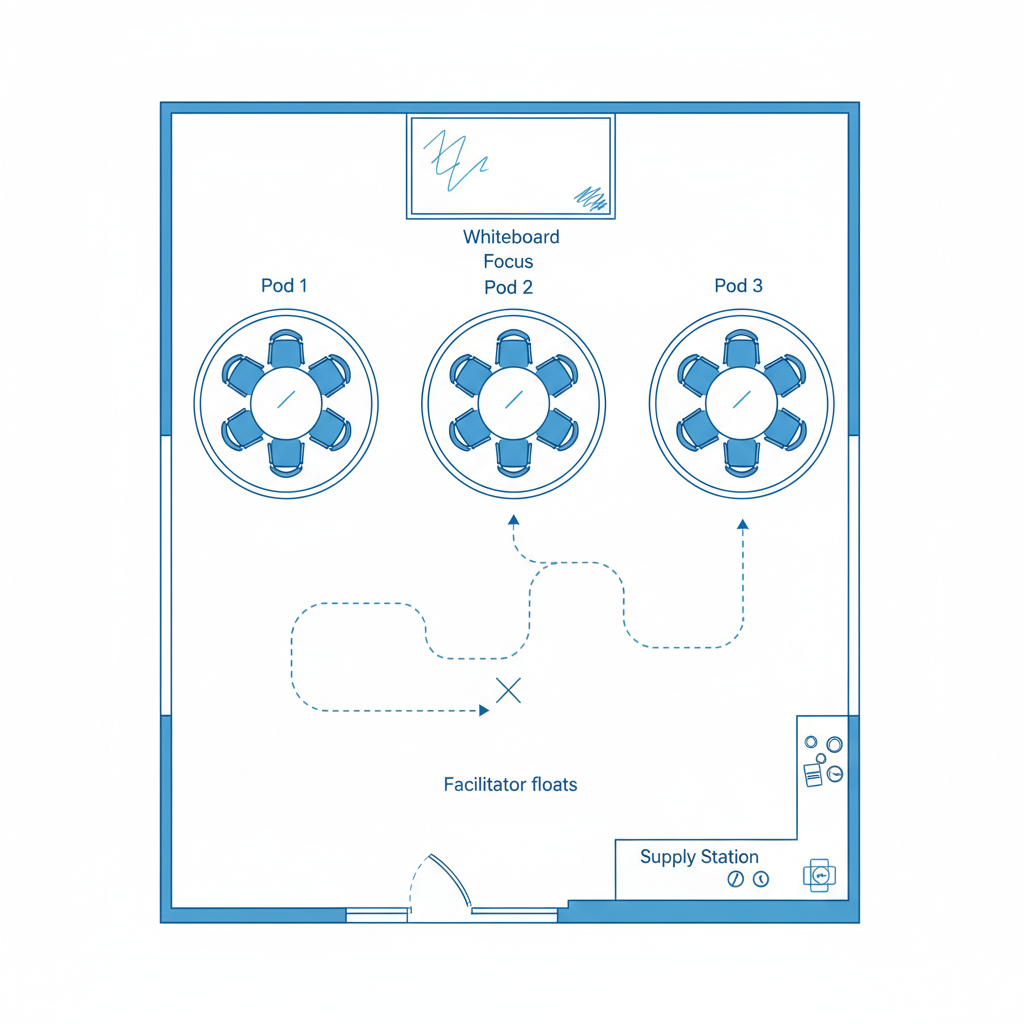
This layout consists of four to six small tables, each accommodating three to five participants. The tables are angled slightly toward a shared focal wall but oriented toward each other rather than the front.
This arrangement is optimal for ideation workshops, design sprints, and sessions that alternate between small-group and full-group activities. It serves as the default layout for most collaborative workshops. Pods foster psychological safety by allowing ideas to originate in small groups, which lowers the perceived risk for participants. These ideas are then shared with the full group. Because groups are pre-formed, transitions to breakout sessions are immediate and efficient.
Facilitator tip: Circulate among the pods during small-group activities. Avoid remaining at a single pod to ensure your presence is evenly distributed.
2. The U-Shape

This layout features tables arranged in a U or horseshoe configuration. Participants are seated on the outer side of the U, facing inward, while the facilitator operates from the open end.
This configuration is well-suited for discussion-focused workshops, stakeholder alignment sessions, and decision-making meetings. It is most effective for groups of eight to fifteen participants. The U-shape ensures that all participants have direct lines of sight to one another, eliminating the concept of a 'back' row. This arrangement encourages face-to-face dialogue.
Facilitator tip: Position yourself at the open end of the U during full-group activities. During discussions, move to the side to facilitate conversation across the U rather than through the facilitator.
3. The Gallery

This layout omits central tables, with chairs loosely arranged in the center of the room. The primary workspace consists of walls covered with paper, whiteboards, or large sticky surfaces. Multiple stations are distributed around the room, each featuring a distinct prompt or activity.
This setup is ideal for gallery walks, design critiques, dot voting, and workshops where outputs are displayed on the walls. It is particularly effective when there is a substantial amount of visual material to review. This approach leverages movement to alter cognitive states. By displaying work on the walls, the focus shifts to the ideas themselves, fostering objective rather than personal discussion.
Facilitator tip: Assign numbers to each station and provide explicit rotation instructions. For example: "Begin at the station nearest to you. You will have eight minutes per station. When the timer sounds, rotate clockwise."
4. The Fishbowl
This layout features a small inner circle of four to six chairs, surrounded by a larger outer circle. Participants in the inner circle engage in discussion, while those in the outer circle observe. Individuals rotate between the circles throughout the session.
This configuration is effective for eliciting diverse perspectives on contentious topics. It is particularly suitable for large groups of fifteen or more participants, enabling focused discussion without devolving into disorder. This method restricts active discussion to a few participants at a time, while rotation ensures that all voices are eventually heard. Entering the inner circle is a deliberate act, promoting intentional participation.
To implement this format, begin with four to five participants in the inner circle and leave one chair empty. Any member of the outer circle may occupy the empty chair to join the discussion, prompting a current inner circle participant to voluntarily exit. The empty chair remains available throughout the session.
Facilitator tip: Populate the inner circle with individuals representing diverse perspectives. Avoid placing all dominant voices in the initial group, as this may hinder rotation.
5. The Theater
This arrangement consists of rows of chairs oriented toward a stage or presentation area, with no tables present.
This setup is ideal for workshop introductions, share-outs, demonstration presentations, or any segment where an individual or small panel presents to a larger audience. It should be reserved for specific portions of the workshop, as it directs attention to the presenter. When it is necessary for the group to focus on a single speaker, this layout is most effective.
Limit sessions in the theater layout to no more than thirty minutes, as this arrangement is inherently passive and may lead to disengagement. If this format occupies more than a quarter of the agenda, the event functions more as a meeting than a workshop.
Facilitator tip: Employ the theater layout for initial context-setting, limiting this segment to fifteen minutes. Subsequently, rearrange the space into pods or a U-shape for collaborative work. The physical act of moving furniture signals a transition from passive listening to active participation.
Mixing layouts in a single workshop
The best workshops use two or three layouts across the day. Here's a common pattern for a full-day session:
| Time block | Layout | Why |
|---|---|---|
| 9:00–9:30 Opening | Theater → U-Shape | Context setting, then transition to discussion |
| 9:30–12:00 Core work | Pods | Small-group ideation and building |
| 1:00–2:30 Review | Gallery | Walking, voting, critiquing wall-based work |
| 2:30–4:00 Decision | U-Shape | Full-group discussion and commitment |
Allocate five minutes in the agenda for each layout transition. Although moving furniture requires time, this activity is valuable, as the physical rearrangement of the space revitalizes participant energy.
The Space Speaks First
The room is never neutral. Every chair you place, every wall you clear, every surface you prepare sends a silent message to your participants about what kind of experience awaits them. Pods whisper "collaborate." Theater rows announce "listen and absorb." A U-shape declares "we're all equals here."
The best facilitators treat their room setup as the first exercise of the day, one that begins before a single participant walks through the door. You don't need a perfect venue or a generous budget. You need intention. Walk into your space early, move the furniture, test the sight lines, and ask yourself: Does this room feel like a place where people will do their best thinking together? If not, rearrange until it does. The room is your opening act; make sure it's setting the stage for the work that matters.
Chapter Five
The Technique Library
Book 1 gave you four techniques: Dot Voting, Affinity Mapping, Crazy 8s, and How Might We. Those four will carry you through most workshops. However, as you take on more complex challenges, you'll want more tools in the kit.
Here are six more techniques, each with the full script, timing, and materials. Combined with the four from Book 1, you have ten building blocks you can mix and match for years.
5. Lightning Demos
30–40 minWhat it does: Surfaces existing solutions and inspiration from inside or outside your industry.
Why it works: It prevents the group from designing in a vacuum. Real examples anchor ideation in what's possible and give the group shared reference points.
6. Rose, Thorn, Bud
20–30 minWhat it does: Structures a balanced retrospective or review — what's working, what's not, and what has potential.
Why it works: The "Bud" category is what makes this more useful than a standard pros/cons list. It creates space for ideas that aren't fully formed — the things people are thinking but aren't confident enough to advocate for yet.
7. Silent Critique
20–30 minWhat it does: Generates honest feedback without social pressure.
Why it works: After the silent round, walk through each piece together. The sticky notes do the initial talking, which means feedback lands on the work, not on the person who created it. It neutralizes the loudest-voice-wins problem. Everyone's feedback has equal visibility. And the silence creates space for people who need processing time.
8. Storyboarding
30–45 minWhat it does: Turns abstract ideas into concrete user scenarios.
Why it works: Share storyboards in small groups first (5 minutes each), then select the strongest elements from multiple storyboards to build a combined version. Sketching forces specificity. You can't storyboard a vague concept — you have to commit to concrete moments. This surfaces gaps and assumptions faster than discussion.
9. Assumption Mapping
25–35 minWhat it does: Identifies the hidden beliefs driving the team's decisions and prioritizes which ones to test.
Why it works: Place all assumptions on the 2×2 grid. Focus energy on the High Risk / Unknown quadrant — those are the ones that could tank the project if you're wrong. Teams move fast and forget that speed is built on untested beliefs. This technique slows them down just enough to identify the belief that, if wrong, makes everything else irrelevant.
10. Forced Ranking
20–30 minWhat it does: Eliminates ties and creates clear priority order by forcing trade-offs.
Why it works: Work through the list as a group using binary comparisons: "Is this more or less important than item 3? More? Is it more or less important than item 1?" Dot voting shows preference. Forced ranking shows priority. When you've dot-voted and three items are tied at the top, forced ranking breaks the tie. It's uncomfortable — people have to make trade-offs they'd rather avoid. That's the point.
Ten techniques. Four from Book 1, six here. You don't need more. Not yet. Maybe never.
Facilitators rarely struggle with too few techniques. The real issue is having too many; second-guessing mid-session, or swapping methods when the room gets quiet, instead of trusting the silence.
Mastery isn't from collecting techniques. It's from knowing when each one belongs.
Don't just memorize these pages, use them. Run Lightning Demos badly at first. Feel the discomfort when Forced Ranking makes a team choose. Start with two or three for your next session. Get comfortable. Add one more as you grow.
Soon, you won't think about techniques. You'll just be facilitating.
Chapter Six
Reading the Room and Recovering
Techniques and agendas are the easy part. The hard part is what you do when the plan meets reality.
Every experienced facilitator has a set of signals they watch for and moves they make in response. This isn't mystical intuition. It's pattern recognition built from experience. Here are the patterns.
The energy signals
Phones appearing.
One phone is a personal emergency. Three phones indicate that the group has checked out. Your move: change the format. If you're in a full-group discussion, shift to pairs. If you're in pairs, shift to individual writing. If you're doing anything seated, get people standing.
Cross-armed postures are multiplying.
One person with crossed arms might just be cold. When half the room crosses their arms, they're either disagreeing with what's being discussed or disengaging from the process.
The same two people are talking.
This means the rest of the group has either ceded the conversation or given up on getting airtime.
Laughter that breaks tension vs. laughter that avoids it.
Sometimes a joke releases pressure, and the group comes back more focused. Other times, humor is a way to deflect from a difficult topic.
The recovery toolkit
When an activity falls completely flat:
Don't panic. Don't apologize.
- Pause the activity.
- Say, "Let me adjust. I'm going to give you a different prompt."
- Switch to a simpler, more direct version of the activity. For example, if Crazy 8s produces blank pages, say, "Just write three ideas in words. No sketching. Three ideas, five minutes."
When a conflict escalates:
Don't try to resolve it in the moment. Contain it.
When you run out of time:
- Be transparent about the situation.
- State your plan. Say, "We have 30 minutes left and two activities remaining. I'm going to cut [activity name] and give us more time for synthesis, because walking out with clear decisions matters more than completing every activity. Does anyone object?"
When the decision-maker overrides the group:
This situation requires care.
- Avoid arguing.
- Document the action. Say, "Okay, I want to capture that [VP name] has made the call to go with [direction]. I also want to note that the group's top-voted option was [other direction]. Both are on the record."
The three-minute self-check
During every break, ask yourself three questions:
- Is the group making progress toward the objective? If yes, stay the course. If no, what's in the way?
- Is the energy where it needs to be for the next activity? If the next activity requires high energy and the group is flagging, adjust.
- Is anyone lost, frustrated, or checked out? If you can identify who, approach them during the break.
This takes three minutes. Do it every break. It's the single highest-leverage habit you can build.
Chapter Seven
Building Your Facilitation Practice
You don't become a great facilitator by reading about it. You become one by facilitating, reflecting, and repeating. Everything in this book is theory until you work with real people.
The post-workshop debrief
Within 24 hours of every workshop, write four things:
- What worked. Which activities landed? Where did the energy peak? What did you say that moved the group forward?
- What didn't work? Which activities fell flat? Where did you lose the room? What would you do differently?
- What surprised you? The unexpected moment that taught you something about groups, about the topic, or about yourself as a facilitator.
- One thing to try next time. Not ten improvements. One. The one thing that would make the biggest difference.
Keep these in a single document. After ten workshops, you'll have a pattern library more valuable than any book, even this one.
The skill progression
Facilitation develops in stages. Here's what the progression actually looks like:
- Workshops 1–5: Following the script. You lean on templates, pre-written instructions, and tight agendas. The focus is execution, getting through the plan. This is where Book 1 lives.
- Workshops 6–15: Reading the signals. You start noticing when an activity isn't working before it fully fails. You make small adjustments in real time. You read your facilitation notes less.
- Workshops 16–30: Designing for the group. You start building agendas from scratch based on what this specific group needs, rather than picking templates. You combine techniques in ways that aren't in any book.
- Workshops 30+: Invisible facilitation. The group doesn't notice facilitation because it feels natural. You adjust timing, swap activities, and follow tangents, and the group experiences a smooth conversation, not a managed process.
You can accelerate this progression by co-facilitating with someone more experienced. Watch how they handle the moments between activities — the transitions, the redirects, the micro-decisions. That's where the craft lives.
Finding your next workshops
If your organization doesn't hand you workshops, go looking for them:
- Offer to facilitate your team's next retrospective. Retros are low-stakes and high-frequency — perfect for building reps.
- Volunteer to run a brainstorming session for a cross-functional project. It doesn't need to be called a "workshop."
- Propose a design critique for a project that's been in review limbo. Frame it as "let's get all the feedback in one room in one hour."
- Facilitate a book club discussion or an internal lunch-and-learn. The techniques are the same.
Every session where you're responsible for the process — even a 30-minute one — is a rep.
What comes next
This book gave you the mindset, the architecture, the space design, and the technique library. Book 3 — Did It Work? — tackles the question that comes after you're comfortable facilitating: How do you prove that workshops actually work? You'll learn how to measure workshop outcomes, calculate ROI for skeptical stakeholders, and build a facilitation culture that scales beyond you.
However, that's for later. Right now, you have a handbook full of techniques and a room full of people waiting for you to make something happen.
Take one technique from this book and apply it in your next session. Afterward, write a short reflection on what worked, what didn't, what surprised you, and one thing to improve for next time. Keep building your pattern library with each workshop you facilitate.
Appendix · Print these
10 Workshop Reference Cards
Print these. Keep them in your facilitation kit. Each card has everything you need to run the technique.
Card 1Dot Voting
- Duration
- 10–15 minutes
- Group
- 5–30 people
- Materials
- Dot stickers (3–5 per person), items posted on wall
- Purpose
- Quickly surface group priorities
InstructionsPost all items on wall. Give each person 3–5 dot stickers. "Place dots on items you think are most important. Multiple dots on one item is fine. No talking during voting." Timer: 5 minutes. Count and rank. Discuss top 3–5.
workshopr.io/dotvotingCard 2Affinity Mapping
- Duration
- 20–30 minutes
- Group
- 4–12 people
- Materials
- Wall full of sticky notes from a previous activity
- Purpose
- Organize individual ideas into themes
Instructions"Come to the wall. Read notes silently. If two notes seem related, move them together. No talking." Timer: 10 minutes. Once clusters form, name each cluster as a group. Review: "Are any of these the same theme? Are any missing?"
workshopr.io/affinityCard 3Crazy 8s
- Duration
- 15–20 minutes
- Group
- 4–15 people
- Materials
- Blank paper (1 per person), markers
- Purpose
- Rapid ideation through time pressure
Instructions"Fold paper in half 3 times for 8 panels. One minute per panel. When I say 'switch,' move on. Speed over quality." Call "switch" every 60 seconds. After 8 minutes: "Circle your favorite. You have 60 seconds to pitch it."
workshopr.io/crazy8sCard 4How Might We
- Duration
- 15–20 minutes
- Group
- 4–15 people
- Materials
- Sticky notes, markers, problem statements or pain points
- Purpose
- Reframe problems as design opportunities
Instructions"For each problem, rewrite it as a question starting with 'How might we…' One per sticky note." Demonstrate: "Users abandon checkout at shipping cost" → "How might we make shipping costs feel fair?" 8–10 minutes, at least 3 per person. Post and cluster.
workshopr.io/hmwCard 5Lightning Demos
- Duration
- 30–40 minutes
- Group
- 4–10 people
- Materials
- Laptops, timer, sticky notes
- Purpose
- Surface inspiration from existing solutions
Instructions"Find 2–3 examples of how others have solved similar problems. You have 15 minutes to search. Then 3 minutes each to present your best find. Everyone else: capture what you like on sticky notes." Post notes after all demos.
workshopr.io/lightningCard 6Rose, Thorn, Bud
- Duration
- 20–30 minutes
- Group
- 4–15 people
- Materials
- Green, pink, and yellow sticky notes, markers
- Purpose
- Balanced retrospective — working, broken, potential
InstructionsGreen = Roses (what's working). Pink = Thorns (what's painful). Yellow = Buds (what has potential). One thought per note. 8 minutes. Post in three columns. Cluster. Discuss patterns starting with Buds.
workshopr.io/rtbCard 7Silent Critique
- Duration
- 20–30 minutes
- Group
- 4–12 people
- Materials
- Printed or posted designs, green and pink sticky notes
- Purpose
- Honest feedback without social pressure
InstructionsReview each [design/concept] silently. Green notes for what's working. Pink notes for questions or concerns. Stick them directly on the work. No talking until everyone has reviewed everything. Walk through each piece together after the silent round.
workshopr.io/silentCard 8Storyboarding
- Duration
- 30–45 minutes
- Group
- 4–10 people
- Materials
- Large paper with 6–8 panel template, markers
- Purpose
- Turn abstract ideas into concrete user scenarios
InstructionsSketch a user story. Panel 1: Where does the user start? Panels 2–7: What happens step by step? Panel 8: What's the outcome? Stick figures are fine. 20 minutes. Share in small groups, then combine strongest elements.
workshopr.io/storyboardingCard 9Assumption Mapping
- Duration
- 25–35 minutes
- Group
- 4–12 people
- Materials
- Sticky notes, 2×2 grid on wall (High/Low Risk × Known/Unknown)
- Purpose
- Surface hidden beliefs and prioritize what to test
InstructionsWrite assumptions as 'We assume that…' statements. One per note. Aim for 5+ each. 8 minutes. Place on 2×2 grid as a group. Focus discussion on the High Risk / Unknown quadrant.
workshopr.io/assumptionCard 10Forced Ranking
- Duration
- 20–30 minutes
- Group
- 4–10 people
- Materials
- Index cards or sticky notes with items to rank, numbered list on wall
- Purpose
- Eliminate ties, create clear priority order
Instructions"We're ranking these in strict order. No ties. I'll start with two. Which is more important? Then we'll insert the rest one at a time." Use binary comparisons to narrow placement quickly.
workshopr.io/forcedWant these as printable cards? The PDF download includes all 10 reference cards formatted for printing — cut them out and keep them in your facilitation kit.
Get the PDF freearrow_forwardBack matter
The Workshopr Facilitation Series
This is Book 2 of 6 in The Workshopr Facilitation Series.
The Series
Run Your First Design Workshop in 72 Hours
A day-by-day sprint plan for your first workshop. 7 chapters.
Facilitating With Intention — you are here
The mindsets, methods, and moves that separate good facilitators from great ones. 7 chapters.
Did It Work?
Measuring workshop impact when half of it can't be put on a slide. 8 chapters.
They'll Never Say Yes
Selling internal workshops to leaders who think they don't have time. 6 chapters.
Get Out of the Car
On running rooms where you're not the most senior, the most expert, or the most expected. 8 chapters.
The Synthesis Playbook
AI-assisted recipes for turning workshop outputs into defensible decisions. 12 chapters.